Myofascial Release Workout Plan: A 4-Week Routine at Home
A physio's 4-week myofascial release workout plan you can do at home: short foam roller and ball sessions, the rules of the roll, a simple body check and FAQs.
Myofascial Release Workout Plan: A 4-Week Routine at Home
Here’s a slightly strange thought for your morning coffee: you’re wearing a full-body suit you can never take off. It wraps every muscle, threads around every organ and runs from the soles of your feet to the top of your head. It’s called fascia, and when it’s happy, you move like a well-oiled machine. When it isn’t, you creak out of bed like a garden gate that needs a squirt of WD-40.
The good news is that you don’t need fancy equipment or an hour a day to look after it. This myofascial release workout plan gives you four weeks of short, guided home sessions, built the way a physiotherapist would build them: start gently, add a little each week, and actually check whether it’s working. Grab a foam roller (or a tennis ball and a bit of courage) and let’s go.
The short version
What: a 4-week, step-by-step myofascial release routine you can do at home in 10 to 20 minutes.
How often: 3 sessions a week to start, building to 4 or 5 short ones.
The golden rule: slow, steady pressure at about 4 to 6 out of 10. Never sharp, never shooting, never “grit your teeth”.
What to expect: most people feel looser after a session. Longer-lasting change in flexibility takes consistent practice over several weeks.
The twist: every release is paired with an activation move, because loosening tissue is only half the job.
What myofascial release actually is (and what it isn’t)
“Myo” means muscle and “fascia” is the connective tissue that surrounds and links it. Picture the white, cling-wrap-like layer you see on a chicken breast. In your body that layer is continuous, which is why tight calves can sometimes make your hamstrings or lower back feel grumpy too. Researchers describe fascia as a body-wide web that transmits force and is packed with sensory nerve endings, so it’s deeply involved in how movement feels (review on the fascial system).
Myofascial release is any technique that applies sustained, gentle pressure to these tissues to reduce tension and help them glide. A physiotherapist can do it with their hands. At home, you do the self-myofascial version with a foam roller, a ball or a peanut-shaped double ball.
Now for a little myth-busting, because the internet loves a dramatic claim:
Myth: you’re “breaking up” fascia or scar tissue. Reality: fascia is remarkably tough. The feel-good effect seems to come mostly from your nervous system turning down muscle tone and pain sensitivity, plus warmth and movement.
Myth: more pain means more gain. Reality: pain makes muscles guard and tighten. Comfortable pressure works better.
Myth: it fixes posture on its own. Reality: it opens a window of easier movement. What you do in that window (activation and strengthening) is what sticks.
That last point is the whole philosophy behind Myofascial Activated Posture (MAP): release, then activate, then move well. You’ll see that pattern all through this plan.
What the research says (in plain English)
We like evidence around here, so here’s an honest summary of what studies on foam rolling and self-myofascial release show:
Flexibility improves in the short term. A systematic review found that rolling can increase joint range of motion for a while afterwards without hurting muscle performance (Cheatham et al., 2015).
It can take the edge off soreness. A meta-analysis found rolling after exercise may reduce how sore muscles feel, and rolling before exercise may give a small flexibility boost (Wiewelhove et al., 2019).
Lasting change needs time. A review of longer rolling programmes suggests flexibility gains need more than about four weeks of regular practice to show up reliably (training meta-analysis). So think of this plan as your launchpad, not the finish line.
Nobody has found the “perfect” time per muscle. Researchers still don’t agree on the ideal rolling duration (Hughes & Ramer, 2019), which is why this plan uses a sensible range of 30 to 90 seconds.
Pain relief is promising but mixed. A review of foam rolling and pain found encouraging but not universal results (systematic review). Persistent pain deserves a proper assessment, not just more rolling.
Physio tip
Rolling is a great warm-up and a lovely wind-down. It’s not a substitute for strength. The people who get the best results pair it with movement, and that’s exactly what weeks 3 and 4 of this plan do.
Before you start: the 60-second body check
Here’s the bit most routines skip. If you don’t measure, you can’t tell whether something’s working. Do these four quick tests on day one, write down the results (your phone’s notes app is perfect), and repeat them at the end of week 4.
Toe reach: stand with your feet together, knees straight, and slowly reach down. Where do your fingertips get to? Knees, shins, ankles, toes, floor?
Back-scratch test: reach one hand over your shoulder and the other up behind your back. How many finger-widths apart are your hands? Check both sides.
Neck turn: sit tall and turn your head to each side. Does your chin line up with your shoulder, or stop short?
Breath check: put one hand on your chest and one on your belly and take a slow breath. Which hand moves more? (We’re aiming for the belly and lower ribs.)
Also rate your general stiffness out of 10 when you get out of bed. It’s surprisingly satisfying to watch that number drop.
Your kit (and a budget swap for each)
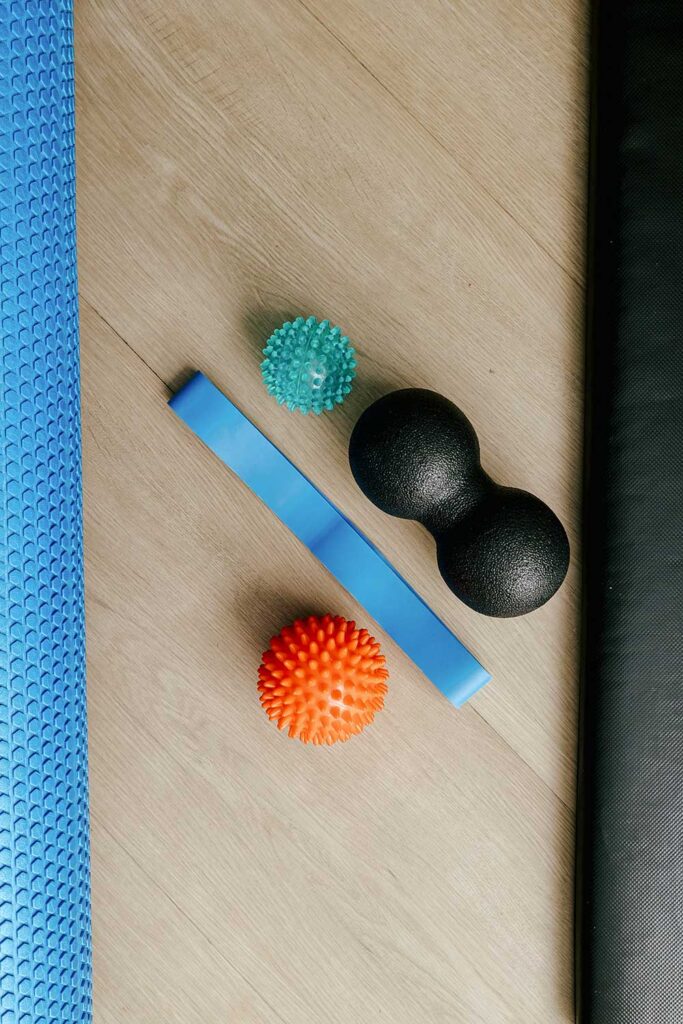
You need less than you think. One foam roller and one ball will cover almost everything in this plan. Here’s what each tool does best:
Tool
Best for
How it feels
Budget swap
Long foam roller (around 90 cm)
Upper back, lying lengthwise to open the chest, calves, thighs
Broad and forgiving, ideal for beginners
A firmly rolled bath towel or yoga mat
Short foam roller (around 45 cm)
Legs and travel
Same pressure, easier to pack
A smooth water bottle (for calves only)
Trigger point ball
Feet, glutes, between the shoulder blades, chest
Focused and deeper, so go gently
A tennis ball, which is softer and a good starting point
Peanut ball (double ball)
Either side of the spine, base of the skull
Straddles the spine so it never presses on bone
Two tennis balls taped together in a sock
Looped resistance band
The activation moves in weeks 3 and 4
Light resistance that wakes up the muscles
Your own bodyweight, done slowly
Start with the softest option. You can always go firmer later.
The whole toolkit: a foam roller, a peanut ball and a couple of trigger point balls.
How to do myofascial release correctly: the rules of the roll
Technique matters more than the tool. Stick to these seven rules and you’ll get more out of every minute:
Use the 4-to-6 pressure scale. On a scale where 0 is nothing and 10 is unbearable, stay between 4 and 6. You should be able to breathe slowly and keep your face relaxed. If you’re holding your breath, ease off.
Go slow. Move about 2 to 3 cm per second. Think of a snail on a lazy Sunday, not a rolling pin on pizza dough.
Pause on tender spots. When you find a tender spot, stop and breathe for 20 to 30 seconds until it eases by a point or two.
Spend 30 to 90 seconds per area. Longer isn’t automatically better.
Breathe out into the pressure. Long exhales tell your nervous system it’s safe to let go. The NHS has a simple breathing exercise for stress that works beautifully here.
Avoid bones, joints and the front of the neck. Roll the muscle, not the kneecap, hip bone or spine itself.
Don’t foam roll directly on the lower back. Your lower spine has no ribcage to protect it. Use a ball on the glutes and a peanut ball beside the spine instead.
Good discomfort vs bad pain
Good: a dull, “that’s-the-spot” ache that fades as you breathe. Bad: sharp, burning, shooting, tingling or numb feelings, or pain that lingers for hours afterwards. Bad pain means stop. It’s a message, not a challenge.
The 4-week myofascial release workout plan
Each week builds on the last. Do the sessions on non-consecutive days if you can (Monday, Wednesday and Friday works well), and treat the timings as a guide, not a stopwatch exam. Here’s the big picture:
Myofascial line exercises: back, front, side and spiral
3
Release + activate
3 to 4 per week
15 to 18 min
An activation move after every release
4
Flow
4 to 5 per week
15 to 20 min
One continuous flow, then repeat your body check
Missed a session? Just carry on. Consistency over the month matters far more than a perfect week.
Week 1: Wake-up (foundations)
This week’s mission: learn the pressure scale and make friends with your foam roller. Nothing heroic.
Belly breathing (1 minute). Lie on your back, knees bent, one hand on your belly. Breathe in through your nose for 4, out through your mouth for 6. Feel your lower ribs widen.
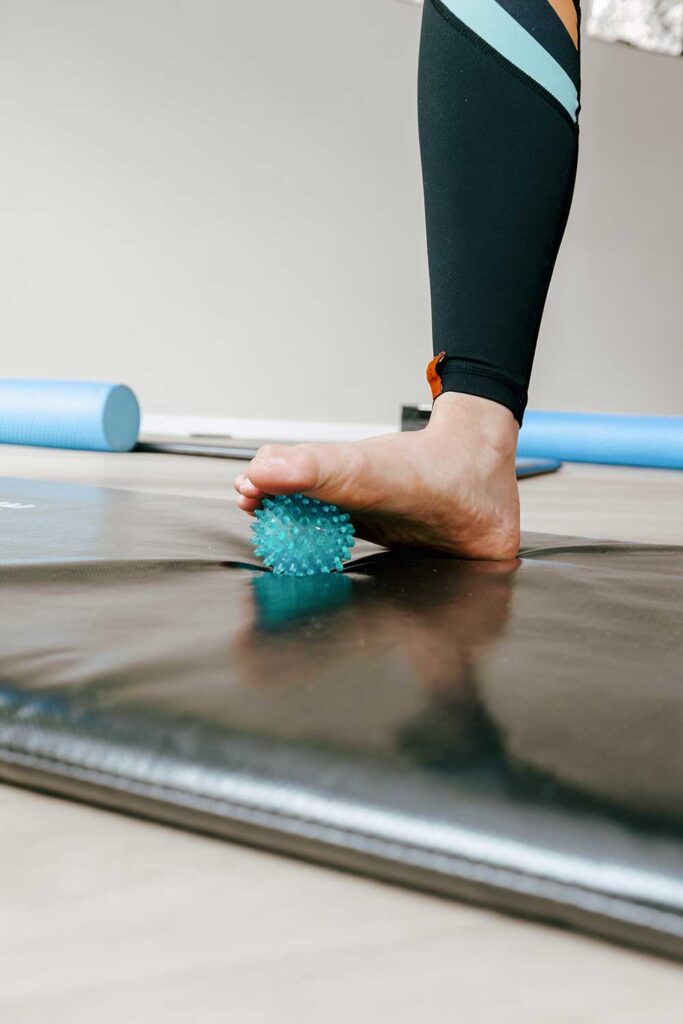
Foot roll (1 minute per foot). Standing or seated, roll the sole of your foot slowly over a ball from heel to toes. Pause on tender spots.
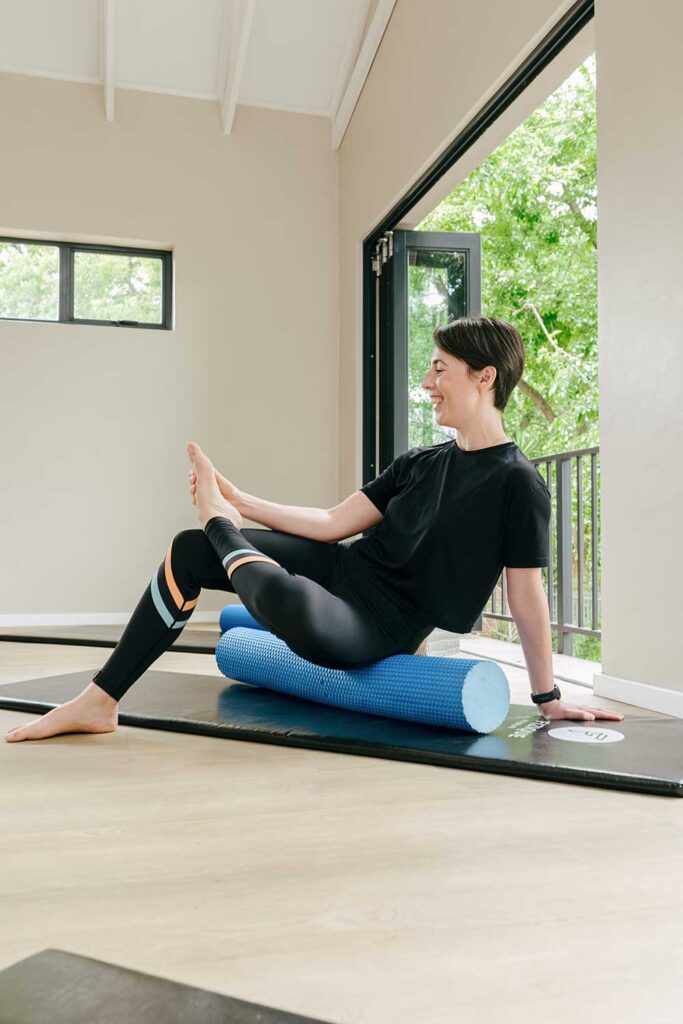
Calf roll (1 minute per leg). Sit with your calf on the roller, hands behind you. Lift your hips and roll from ankle to just below the knee. Cross the other leg on top only if you want more pressure.
Front thigh (1 minute per leg). Lie face down on your forearms with the roller under your thighs. Roll from just above the knee to the hip crease.
Upper back (1 minute). Lie with the roller under your shoulder blades, hands supporting your head, hips on the floor. Roll gently between the bottom of your shoulder blades and the top of your shoulders. Stay off your neck and lower back.
Chest opener (2 minutes). Lie lengthwise along the roller so it supports your head and spine. Let your arms fall open into a “W” or “T” shape and simply breathe.
The chest opener: possibly the most relaxing two minutes of your week.
Feet are a brilliant place to start because they’re the anchor of the whole back line of fascia. Want to feel it? Do the toe reach test, roll one foot only for a minute, then test again. Many people notice the rolled side reaches a little further. It’s a fun party trick, and it shows how connected everything is.
Foot rolling: small ball, surprisingly big effect.
Week 2: Follow the lines (myofascial line exercises)
This week’s mission: stop thinking in single muscles and start thinking in chains.
Fascia links muscles into long lines that work together. You don’t need to memorise anatomy charts. Just know that working along a whole line often feels better than hammering one spot. Keep your week 1 warm-up (breathing, feet and chest opener) and add one line per session:
Back line (soles of feet to scalp): foot roll, then calves, then hamstrings (sit on the roller and roll the back of the thighs), then glutes (sit on a ball and lean slightly to one side).
Front line (top of feet to neck): shins (kneel on all fours and roll the outer shin gently), then front thighs, then the chest opener.
Side line (outer ankle to ear): lie on your side and roll the outer hip just below the hip bone, then the side of the ribcage. Skip hammering the IT band on the outer thigh. It’s very tender and there’s little reason to suffer through it.
Spiral line (the “twist”): roll the upper back, then lie on your side with knees bent and slowly open your top arm like a book, following it with your eyes.
Working the back line: shift your weight to one side to find the glutes.
Week 3: Release + activate
This week’s mission: use the “window” that rolling opens. After each release, do one activation move straight away for 8 to 10 slow reps. This is where myofascial activation comes in, and where posture starts to change.
Glutes on the ball, then glute bridge: lie on your back, feet hip-width apart, squeeze your bottom and lift your hips. Lower slowly.
Upper back on the roller, then band pull-apart: hold the band at chest height, arms straight, and draw it apart by squeezing your shoulder blades together.
Outer hip on the roller, then band clamshell: lie on your side with knees bent and the band above your knees. Open your top knee like a clam without rolling your pelvis back.
Chest opener, then dead bug: lie on your back with arms up and knees at 90°. Slowly lower the opposite arm and leg while keeping your lower back gently on the floor. Breathe out as you lower.
Calves on the roller, then slow calf raise: rise up onto your toes for 2 seconds and lower for 4.
Physio tip
Activation moves should feel like “switching the lights on”, not like a gym workout. If you’re shaking or straining, use less band or fewer reps. Quality beats quantity every time.
Week 4: Flow, then retest
This week’s mission: put it all together into one smooth routine you can keep doing for months. Move from one exercise to the next without long breaks:
Belly breathing: 1 minute
Feet: 1 minute each
Calves, then calf raises
Hamstrings and glutes, then glute bridge
Outer hip, then clamshell
Upper back, then band pull-apart
Chest opener, then dead bug
Open book: 5 slow reps each side
Finish lying lengthwise on the roller for 5 long breaths
At the end of the week, repeat your 60-second body check. Compare your notes. Did your fingertips get closer to the floor? Do your hands meet more easily behind your back? Is your morning stiffness score lower? Whatever the result, you’ve built a habit, and that’s the hard part done.
The 10-minute morning fascia routine (for busy days)
Some days you have 20 minutes. Some days you have a toddler, a traffic jam and a 7:30 meeting. On those days, do this daily morning routine for fascia release instead. It’s especially good if you’re one of those people who feels about 90 years old for the first hour of the day.
Belly breathing in bed: 5 breaths
Knee rocks side to side, lying on your back: 30 seconds
Foot roll while the kettle boils: 1 minute each
Upper back on the roller: 1 minute
Chest opener: 1 minute
Glute bridges: 10 slow reps
Standing side reach: 5 per side
Gentle neck turns, looking over each shoulder: 5 per side
If mornings are your hardest time, you’ll find more ideas in our guide to easing morning stiffness.
Neck and posture corner (for desk-bound humans)
Long hours at a laptop pull many of us into the same shape: head forward, shoulders rounded, upper back stiff. Self-myofascial release can make it easier to sit and stand tall, especially when you combine it with regular position changes. The NHS has a handy guide to common posture mistakes and fixes if you’d like the bigger picture.
Three gentle moves for neck and posture:
Base-of-skull release: lie on your back and rest the base of your skull on a soft peanut ball, so each ball sits either side of the spine. Let your head get heavy and gently nod “yes” a few times. Keep the pressure light. This should feel soothing, never sharp.
Between the shoulder blades: stand with a ball between your upper back and a wall. Bend your knees slightly to roll it up and down beside (not on) your spine.
Chest release: put a ball just below your collarbone, near the front of your shoulder, and lean gently into a wall. Slowly slide your arm up the wall and back down.
Rolling too fast. Fix: halve your speed, then halve it again.
Holding your breath. Fix: hum quietly. You can’t hum and hold your breath at the same time.
Camping on one painful spot for 5 minutes. Fix: 20 to 30 seconds, then move on. You can come back later.
Rolling straight onto the lower back or neck. Fix: use a peanut ball beside the spine, or work the glutes and upper back instead.
Only rolling, never moving. Fix: add the activation moves from week 3.
Doing it once and giving up. Fix: put it in your calendar like any other appointment. Three short sessions a week beat one marathon session every Sunday.
Self-myofascial release is safe for most healthy adults, but it isn’t for everyone or every situation. Skip it, or get the go-ahead from a health professional first, if any of these apply:
A recent injury, such as a sprain, a muscle tear or a heavy bruise
A known or suspected blood clot (DVT), or if you take blood thinners
Osteoporosis or fragile bones
Varicose veins (avoid rolling directly over them)
Recent surgery, open wounds or skin conditions in the area
Pregnancy (gentle work is often fine, but check with your healthcare provider about positions)
Pain that wakes you at night, numbness, pins and needles, weakness, or pain together with fever or unexplained weight loss
Congratulations, you’ve built a habit! Here’s how to make it last:
Keep the flow 3 to 4 times a week and use the 10-minute morning routine on busy days.
Add strength. The World Health Organization recommends at least 150 minutes of moderate activity a week for adults, plus muscle-strengthening activities on two or more days (WHO physical activity guidance). Your release routine makes that strength work feel smoother.
Two to three sessions a week is a great start, and many people build up to short daily sessions. Light, gentle rolling can be done most days. Give an area a day’s rest if it feels tender the next morning.
How long should I roll each muscle?
Between 30 and 90 seconds per area works well for most people. Research hasn’t settled on one ideal duration, so stay within that range and pay attention to how your body responds.
Should myofascial release hurt?
No. Aim for pressure of about 4 to 6 out of 10: a dull, satisfying ache that eases as you breathe. Sharp, burning, shooting or tingling pain means you should stop or reduce the pressure.
Should I foam roll before or after a workout?
Both can help. A few minutes before exercise can improve flexibility for a short time, and rolling afterwards may reduce how sore your muscles feel. Before a workout, keep it brief and follow it with active movement.
Can I use a foam roller on my lower back?
It’s best not to roll directly on the lower back, because there’s no ribcage there to protect the spine. Release the glutes and upper back instead, or use a peanut ball beside the spine with gentle pressure.
How long does it take to see results from myofascial release?
Most people feel looser straight after a session. Lasting improvements in flexibility usually take regular practice over more than four weeks, so treat this plan as the start of a longer habit.
Is myofascial release the same as stretching?
Not quite. Stretching lengthens muscles by moving joints to the end of their range. Myofascial release uses pressure to reduce tension in the tissues. They work well together: release first, then stretch or activate. Physiopedia has a useful overview of stretching.
Can I do myofascial release if I have trigger points or knots?
Yes. Gentle sustained pressure on a tender knot for 20 to 30 seconds is a common self-care approach. If knots keep returning or cause referred pain, have them assessed. Physiopedia explains more about myofascial pain.
This article is general information and isn’t a substitute for a personal assessment. If you’re unsure whether these exercises suit you, speak to a physiotherapist.